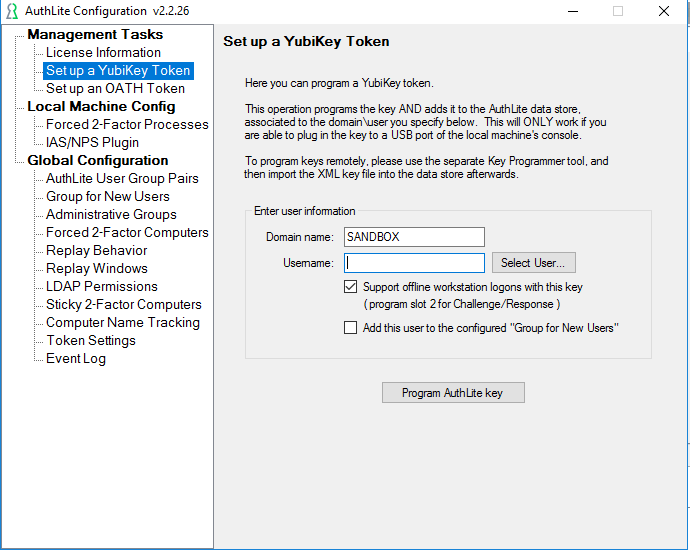
Provisioning YubiKeys from the AuthLite Configuration application
If you have physical access (not a remote session or virtual console) to a domain member with AuthLite software installed and a free USB port, then you can provision YubiKeys one at a time with this simple process.
Note: If you are using a short Public ID length, then you should program your keys with sequential IDs instead of random ones, to avoid collisions. This means you cannot use the AuthLite Configuration application, since it does not allow you to select sequential IDs. Use the remote/bulk programming method instead.
Prerequisites
AuthLite software installed on all domain controllers and (if you are going to administer from a workstation) on that workstation machine.
Valid license or evaluation key entered.
Procedure
Insert the YubiKey into a USB port on the server/workstation you are using.
Launch AuthLite Configuration.
Select the item “Set up a YubiKey Token” as shown in Figure 1
The “Domain Name” box should contain the NETBIOS domain of the user account you wish to associate with this YubiKey. If your user is not in this domain, then you must install AuthLite in the domain where the user is homed.
In the “Username” box, enter the username (SAM account name, NOT UPN) of the user account you wish to associate with this YubiKey.
Select the Add to New Users Group checkbox and the user account will automatically be added to the AuthLite Users group.
Click the “Program AuthLite key” button.
This YubiKey is now associated to the user account you specified.
Note: simply being an AuthLite User or having a token does not require you to use 2-factor login anywhere. You need to set up Enforcement too!

